
First of all, this tutorial only applies to the specific mk5 components of the armour, so you will need to join the dots with the other, generalised components of the marine.
Tools
You will need the following equipment:
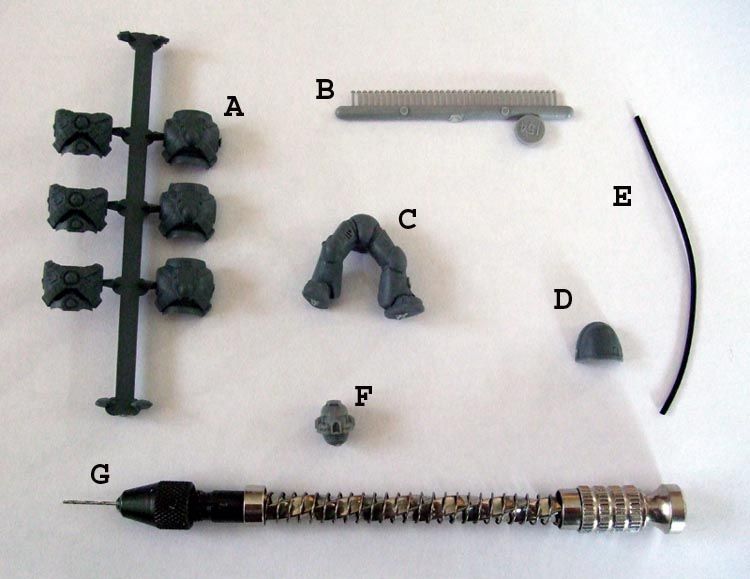
A) SM assault trooper torso. These don't have many applications, so are usually fairly easy and cheap to get hold of from bits websites.
B ) Grandt Line railway rivets. These are available in large quantity from places such as Antenocetti's workshop or SBmodels.net (if you don't mind the minimum £10 order). Either the '#154' or '#153' if you want them a little smaller are fine. Note these are from the UK, but as Grandt Line are an American company they should be fairly easy to get hold of in the US. They come in packs of 100 so a single pack should do several marines.
C) Standard mk7 marine legs, again if you've done much converting in the past you should have piles of these things lying around!
D) Standard mk7 shoulder pad, again the kind of thing thats very cheap (I've seen them as cheap as 7p each from bitsandkits.co.uk!) to get hold of from bits websites if you don't already have them. Its also possible to use Chaos Marine shoulder pads, but they will need filing down so the less detail on them the better!
E) Rubber tubing. I've used the brake hosing you get with Tamiya car/bike model kits, but anything which is roughly 1-2mm, flexible and cutable is ok. Bigwill (check out his Heresy Workshop) also says that Dragon Forges White Steel Cable makes a great alternative to this, which has more detail!
F) Standard mk7 head. If possible, this should be the one with the 'double wires' which come from the grill and looks more like the mk5 helm, rather than the other one. Fortunately, these helmets tend to be so cheap from bits websites you can order a batch of them for almost nothing and get the correct ones.
G) Modelling drill. I use an 'archimedes drill' which is available from most hobby shops, and fitted with a 0.8mm drill bit. However, you should be ok with a 0.6 or up to about a 1.2mm bit assuming you use the grandt line rivets.
The Conversion
1) Clean up the components:
This includes: - remove the Imperial Aquila from the Assault chest, and if you prefer the skull from the centre (I personally think it looks better with this removed). - Remove the purity seals from the legs, try and make as smooth a finish as possible with this. - Trim the rim from both shoulder pads so that it is smooth as possible. - Trim the stabiliser/ridge from the top of the mk7 helmet, so it looks like a completely smooth, bullet-head.
2) Adding the rivets:
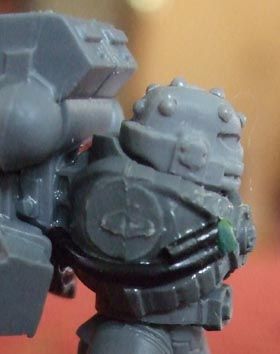
This is probably the hardest part of the operation, you need to add rivets to the head, a single shoulder pad and both legs. First of all is the drilling phase. Use a craft knife to mark where you want to drill - the important thing here is to be as consistent as possible with the spacing, and not to try and cram too many rivets on. I have several lost marine legs which occupy the 'Frankenstein's failures' parts of my bits box because I became frenzied in my drilling. In total, I found 16 rivets per leg and 10 on the left shoulder pad is enough. When drilling, try to drill only deep enough for the rivet and perhaps 3-4mm of the rivet length to go inside for a secure fit. Some of the legs will have pockets of air inside, and you will suddently find yourself drilling through the opposite side of the leg if you go too far! When attaching the rivets, clip off a few mm length of the rivet with clippers, and dip the non-rivet end in an already prepared pool of plastic glue. You only need the tiniest bit of glue, too much and it will squirt out from the side and make a mess! To be honest, this is the hardest part - I lost many, many rivets with my first ham-fisted attempts, the damned things seem to dissapear the moment you drop them. Here is an example of a completed shoulder pad, with the rims removed and rivets added (its possible to make a much more accurate job than this):

Its worth taking the most time making sure the rivets are evenly spaced on the head - if they are not, it will stand out far more than had it been on another part of the model.
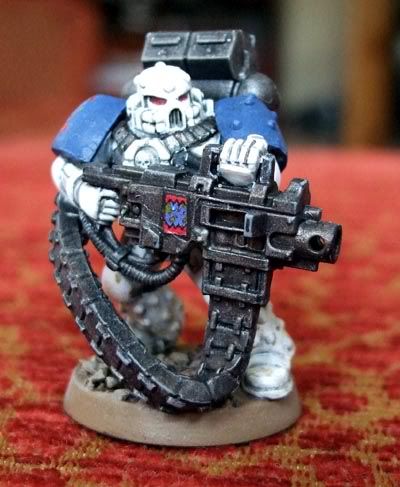
3) Creating the Torso: Simply add the tubing from front to back. You can double this up as I have done, or add even more if you want to more accurately portray some of the pictures which show mk5 as very cable-heavy. Be careful however not to add too much thick cabling which might then prevent you attaching the arms!
Frontal shot showing the completed trunk in more detail:

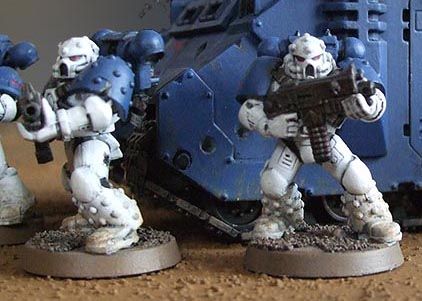
Finally, examples of some completed marines:
I hope this is a useful tutorial for making perhaps one of the most distinctive pre-heresy armours! If any part of my description has been too obscure, please let me know and i'll try and reiterate it!
Here are the direct links if the pictures do not appear next to the captions:


Nice tut, and great looking conversions. You just keep all this good stuff coming!
ReplyDeleteI like this modified helmet, will try it or sure...
ReplyDeleteThey look good. The rivets sound a nightmare though. did you consider creating the rivets by blobbing on dots of plastic glue mixed with spare sprue to avoid all that drilling?
ReplyDeleteIt would be nice if the pictures were hosted somewhere where I could actually see them.
ReplyDeleteI've tried numerous methods to be honest. This one favours perseverance over dexterity, but for a good PVA method try Whitehorn's PVA method on the Mywargames website: http://www.mywargame.com/2010/02/11/creating-pre-heresy-marines-part-6b-mark-v-power-armour/
ReplyDeleteSorry if the photos are not working, I will include direct links to photobucket at the bottom of the post.